目录
- 1、前言
- 2、代码实战
- 2.1思路
- 2.2文件准备
- 2.3实战
- 2.4色值转换
- 2.5图片转换
- 2.6代编程客栈码整合
- 2.7运行结果
- 3、总结
1、前言
这里说的,不是截fKusyukv取一张图片,粘贴到excel;而是通过像素写入到excel中,下面来看看具体的实现过程吧
2、代码实战
2.1 思路
我们今天要分享的,是把图片写入到excel中,
我们来捋一下思路:
- 准备源图片,目标
excel; - 通过
Pillow来读图片的取像素(RGB); - 通过
openpyxl向excel cell内填充十六进制色值; - 最后把转换的RGB像素直接写入到
excel中; - 说到这里,就们就来分步实现。
2.2 文件准备
需要写入而Excel的源图片:

2.3 实战
安装:
本次需要用到两个模块: Pillow 和 openpyxl 。
老规矩, pip 方式安装:
pip install Pillow
pip install openpyxl
2.4 色值转换
由于 图片读取的像素是RGB值,而excel是十六进制写入,
'''
定义RGB 和十六进制色值转换函数
'''

def rgb_to_hex(rgb):
  rgb = rgb.split(',')
  color = ''
  #循环遍历
  for i in rgb:
    num = int(i)
    color += str(hex(num))[-2:].replace('x','0').upper()
  return color
2.5 图片转换
此操作是逐行读取图片的 RGB 色值,再将 RGB 色值转换为十六进制色值填充到 Excel 的 cell 中。
逐行读取图片中的RGB色值,再将RGB色值转换十六进制,填充到excel中:
def img_to_excel(img_path,excel_path):
  #读取源图片
  img_src = Image.open(img_path)
  #设置图片宽高
  img_width = img_src.size[0]
  img_hight = img_src.size[1]

  #图片加载
  str_strlist = img_src.load()
  #获取当前的excel文件
  wb = openpyxl.Workbook()
  #保存文件
  wb.save(excel_path)
  #打开excel_path 下的excel文件,并写入信息
  wb = openpyxl.load_workbook(excel_path)
  cell_width,cell_height = 1.0,1.0

  #设置excel的写入页
  sheet = wb['Sheet']

  #循环图片的高与宽,并存入
  for w in rang编程客栈e(img_width):
    for h in range(img_hight):
      data = str_strlist[w,h]
      color = str(data).replace("(","").replace(")","")
      color = rgb_to_hex(color)

      #设置填充颜色为color
      fille = PatternFill("solid",fgColor = color)
      sheet.cell(h + 1,w + 1).fill = fille

  #循环遍历row,让其全部写入
  for i in range(1,sheet.max_row + 1):
    sheet.row_dimensions[i].height = cell_height
  #循环遍历column,让其全部写入
  for i in range(1,sheet.max_column + 1):
    sheet.column_dimensions[get_column_letter(i)].width = cell_width

  #保存文件
  wb.save(excel_path)
  #关闭
  img_src.close()
2.6 代码整合
import openpyxl
from openpyxl.styles import PatternFill
from openpyxl.utils import get_column_letter
from PIL import Image,ImageFont,ImageDraw,ImageColor


'''
色值转换:
从图片读取的像素块色值是 RGB 值,
RGB 和十六进制色值转换。
'''

def rgb编程客栈_to_hex(rgb):
  rgb = rgb.split(',')
  color = ''
  #循环遍历
  for i in rgb:
    num = int(i)
    color += str(hex(num))[-2:].replace('x','0').upper()
  return color


'''
图片转换:
逐行读取图片中的RGB色值,再将RGB色值转换十六进制,填充到excel中
'''

def img_to_excel(img_path,excel_path):
  #读取源图片
  img_src = Image.open(img_path)
  #设置图片宽高
  img_width = img_src.size[0]
  img_hight = img_src.size[1]

  #图片加载
  str_strlist = img_src.load()
  #获取当前的excel文件
  wb = openpyxl.Workbook()
  #保存文件
  wb.save(excel_path)
  #打开excel_path 下的excel文件,并写入信息
  wb = openpyxl.load_workbook(excel_path)
  cell_width,cell_height = 1.0,1.0

  #设置excel的写入页
  sheet = wb['Sheet']

  #循环图片的高与宽,并存入
  for w in range(img_width):
    for h in range(img_hight):
      data = str_strlist[w,h]
      color = str(data).replace("(","").replace(")","")
      color = rgb_to_hex(color)

      #设置填充颜色为color
      fille = PatternFill("solid",fgColor = color)
      sheet.cell(h + 1,w + 1).fill = fille

  #循环遍历row,让其全部写入
  for i in range(1,sheet.max_row + 1):
    sheet.row_dimensions[i].height = cell_height
  #循环遍历column,让其全部写入
  for i in range(1,sheet.max_column + 1):
    sheet.column_dimensions[get_column_letter(i)].width = cell_width

  #保存文件
  wb.save(excel_path)
  #关闭
  img_src.close()


if __name__ == '__main__':
  #源图片地址
  img_path = './queue.jgp'
  #保存excel地址
  excel_path = './queue.xlsx'
  #执行
  img_to_excel(img_path, excel_path)
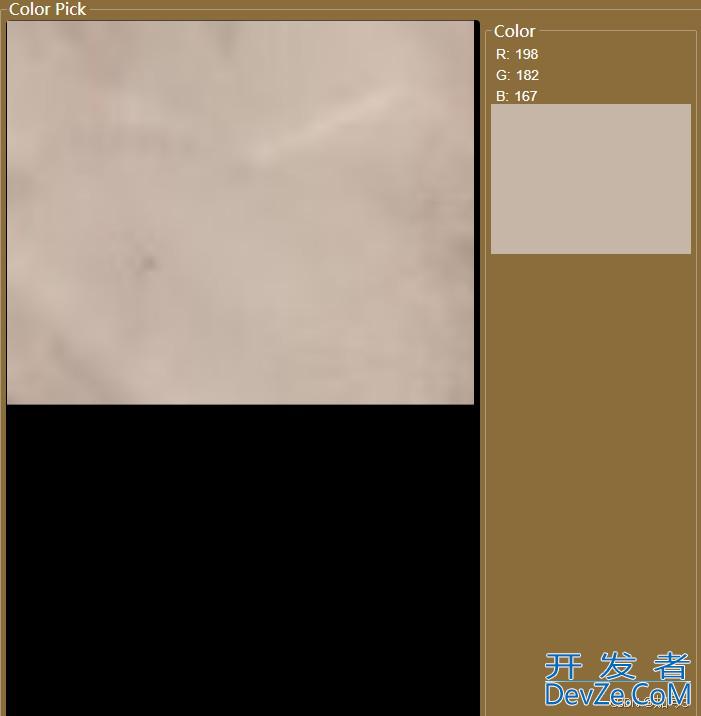
2.7 运行结果

3、总结
这里提醒一下:
如果你的源图片很大,运行完成后,打开Excel会提示文件损坏,因为Excel的行数有限,导致无法全部写完数据。Excel报错详情:

xml报错详情:
<?xml version="1.0" encoding="UTF-8" standalone="yes"?>
<recoveryLog xmlns="http://schemas.openxmlformats.org/spreadsheetml/2006/main"><logFileName>error254800_05.xml</logFileName><summary>在文件“D:\Project\img\king.xlsx”中检测到错误</summary><removehttp://www.cppcns.comdParts><removedPart>已删除的部件: 部件 /xl/styles.xml。 (样式)</removedPart></removedParts><repairedRecords><repairedRecord>已修复的记录: /xl/worksheets/sheet1.xml 部分的 单元格信息</repairedRecord></repairedRecords></recoveryLog>
到此这篇关于如何用python中19行代码把照片写入到Excel中的文章就介绍到这了,更多相关Python3把照片写入到Excel中内容请搜索我们以前的文章或继续浏览下面的相关文章希望大家以后多多支持我们!


 加载中,请稍侯......
精彩评论