目录
- 一、https 简介
- 二、获取 https 证书
- 三、在 SpringBoot 中引入 https
- 四、请求转发
一、https 简介
超文本传输安全协议(HyperText Transfer Protocol Secure),缩写:HTTPS;常称为 HTTP over TLS、HTTP over SSL 或 HTTP Secure)是一种通过计算机网络进行安全通信的传输协议。HTTPS 经由 HTTP 进行通信,但利用 SSL/TLS 来加密数据包。HTTPS 开发的开发者_Go开发主要目的,是提供对网站服务器的身份认证,保护交换数据的隐私与完整性。这个协议由网景公司(Netscape)在 1994 年首次提出,随后扩展到互联网上。
二、获取 https 证书
我们可以直接借助 Java 自带的 JDK 管理工具 keytool 来生成一个免费的 https 证书
1、进入jdk安装目录,我的是在C:\Program Files\Java\jdk1.8.0_201\bin
cd /C:\Program Files\Java\jdk1.8.0_201\bin
2、执行以下命令获取数字证书
keytool -genkey -alias tomcathttps -keyalg RSA -keysize 2048 -keystore D:\httpsKey.p12 -validity 365
命令含义如下:
genkey:表示要创建一个新的密钥。
alias:表示 keystore 的别名。keyalg:表示使用的加密算法是 RSA ,一种非对称加密算法。keysize:表示密钥的长度。keystore:表示生成的密钥存放位置。validity:表示密钥的有效时间,单位为天。其中 D:\httpsKey.p12 是生成证书文件的地址
按照图中步骤进行操作:
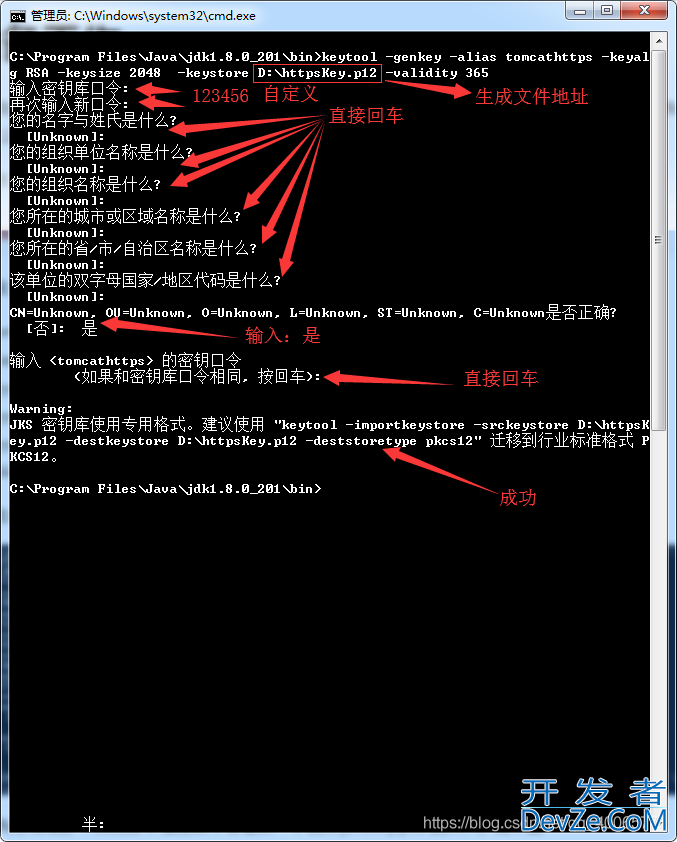
3、以上步骤执行完后,我们在D盘会发现一个 httpsKey.p12 的文件,如下:

三、在 SpringBoot 中引入 https
1、我们将生成的 httpsKey.p12 拷贝到SpringBoot项目中的 resources 目录下
2、并在配置文件 application.yml 中加入以下配置:
server:
  port: 8080
  ssl:
    key-store: classpath:httpsKey.p12
    key-alias: tomcathttps
    key-store-password: 123456
key-store表示密钥文件名。
key-alias表示密钥别名。key-store-password就是在cmd命令执行过程中输入的密码
3、我们在 resources 目录下的 templates 目录下加入一个index.html文件,文件内容:
<!DOCTYPE html>
<html>
<head>
    <meta charset="UTF-8">
    <title>主页面</title>
</head>
<body>
<h1>hello https!!!</h1>
</body>
</html>
4、启动项目,访问http://localhost:8080,此时会出现:

我们使用https协议来访问:https://localhost:8080
此时页面显示: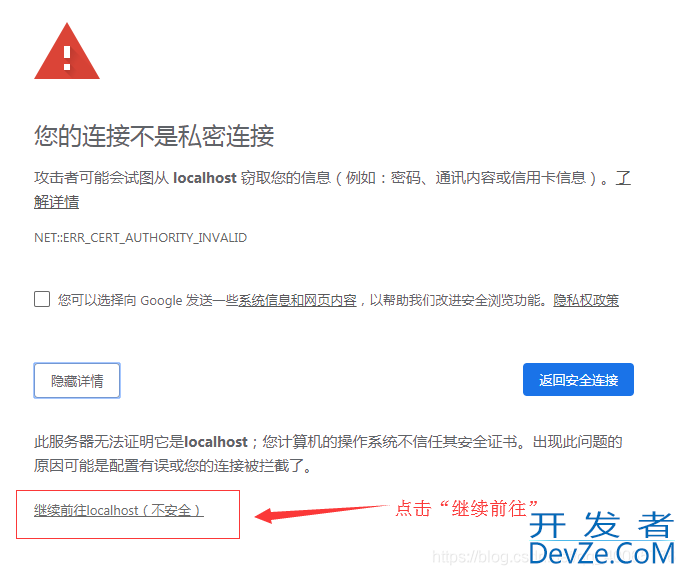
这是因为我们自己生成的 https 证书不被浏览器认可,(实际项目中只需要更换一个被浏览器认可的 https 证书即可),我们直接点击继续访问就可以了:

这样我们就成功的以https协议访问了项目
四、请求转发
考虑到 Spring Boot 不支持同时启动 HTTP 和 HTTPS ,为了解决这个问题,我们这里可以配置一个请求转发,当用户发起 HTTP 调用时,自动转发到 HTTPS 上,配置文件如下:
package com.zyxx.youth.config;

import org.apache.catalina.Context;
import org.apache.catalina.connector.Connector;
import org.apache.tomcat.util.descriptor.web.SecurityCollection;
import org.apache.tomcat.util.descriptor.web.SecurityConstraint;
import org.springframework.boot.web.embeddphped.tomcat.TomcatServletWebServerFactory;
import org.springframework.context.annotation.Bean;
import org.springframework.context.annotation.Configuration;

/**
 * @ClassName RequestConfig
 * 请求转发,当用户发起 HTTP 调用时,自动转发到 HTTPS 上
 * @Author Lizhou
 * @Date 2019-09-19 12:17:17
 * @Version 1.0
 **/
@Configuration
public class RequestConfig {
    @Bean
    TomcatServletWebServerFactory tomcatServletWebServerFactory() {
        TomcatServletWebServerFactory factory = new TomcatServletWebServerFactory() {
            @Override
            protected void postProcessContext(Context context) {
                SecurityConstraint constraint = new SecurityConstraint();
                constraint.setUserCjavascriptonstraint("CONFIDENTIAL");
                SecurityCollection collection = new SecurityCollection();
                collection.addPattern("/*");
                constraint.addCollection(collection)android;
                context.编程addConstraint(constraint);
            }
        };
        factory.addAdditionalTomcatConnectors(createTomcatConnector());
        return factory;
    }

    private Connector createTomcatConnector() {
        Connector connector = new
                Connector("org.apache.coyote.http11.Http11NioProtocol");
        connector.setScheme("http");
        // Http 的请求端口为 8081
        connector.setPoandroidrt(8081);
        connector.setSecure(false);
        // https 的端口为 8080
        connector.setRedirectPort(8080);
        return connector;
    }
}
在这里,我们配置了 Http 的请求端口为 8081,所有来自 8081 的请求,将被自动重定向到 8080 这个 https 的端口上。当我们再去访问 http 请求,就会自动重定向到 https。
到此这篇关于SpringBoot中支持Https协议的实现的文章就介绍到这了,更多相关SpringBoot支持Https协议内容请搜索我们以前的文章或继续浏览下面的相关文章希望大家以后多多支持我们!


 加载中,请稍侯......
精彩评论