目录
- 正文
- 1. X轴的绘制
- 2. Y轴的绘制
- 绘制RightYAxisLabel
- 3. Board 绘制
正文
上篇大致介绍了RecyclerChart能够绘制的图表,以及一些特有的功能。从这节开始具体地介绍图表的绘制,本节先介绍RcyclerChart中一些图表的相关辅助的绘制,X、Y轴,以及Board的绘制。
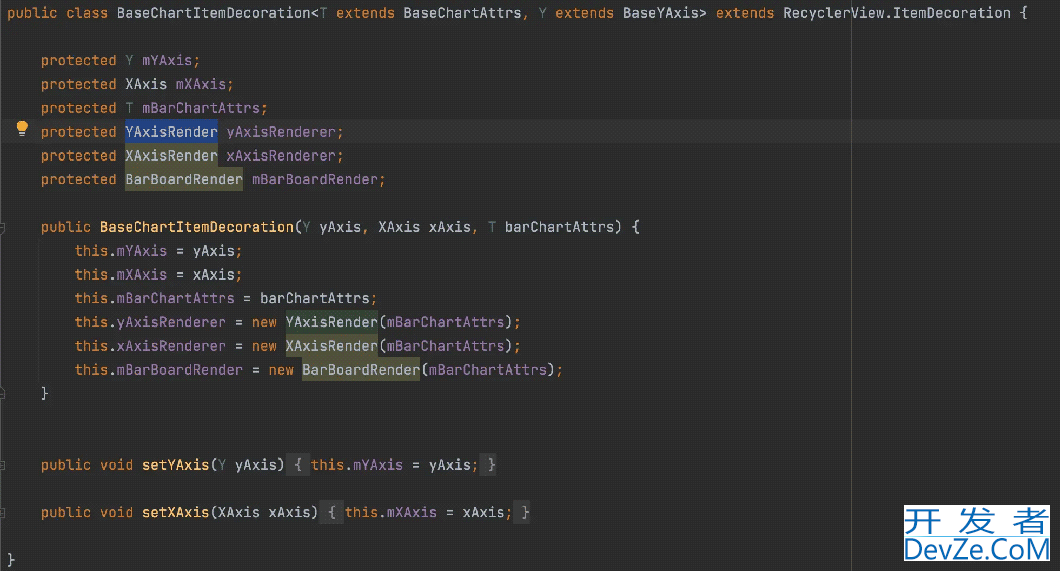
上一章节有介绍绘制的逻辑都在ItemDecoration中实现的,而各种图表基本都有X、Y轴、Board相关的绘制,所以把他们的相关逻辑抽象到上层的基类BaseChartItemDecoration, 包含 YAxisRender、XAxisRender、BarBoardRender三个绘制的Render中显示相关的绘制逻辑,子类的相关的X、Y轴及Board 的相关绘制可以override单独实现, 泛型参数 BaseChartAttrs, BaseYAxis 根据具体的图表传递不同的类给Render进行绘制。
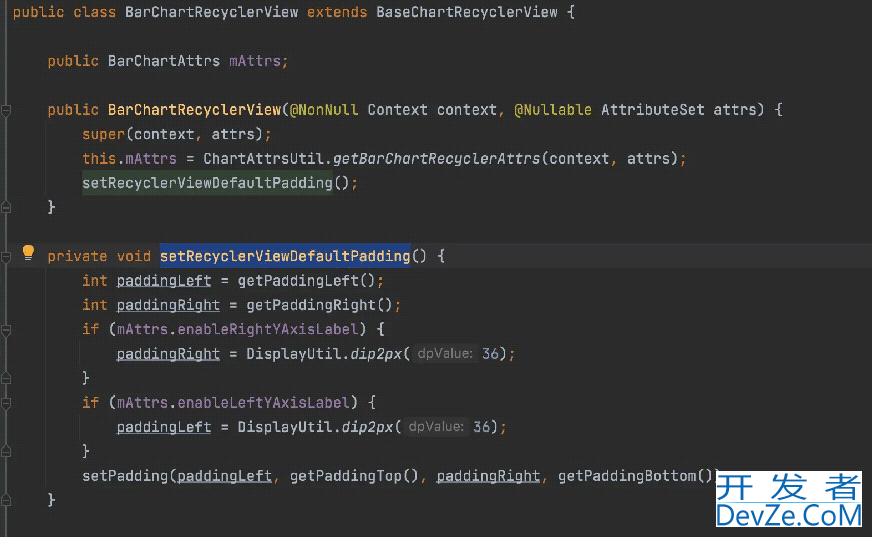
X、Y轴相对而言并不属于单个ItemView的附属,属于整个Chart的附属,所以单独地让RecyclerView设置Padding,然后利用padding的空间绘制X、Y轴,以BarChartRecyclerView为例:
1. X轴的绘制
ReycylerView中每个Item Model 为 RecyclerEntry, 其中包含一个字段 type, 会根据当前的位置设定一个值。
public static final int TYPE_XAXIS_FIRST = 1;//一个月
public static final int TYPE_XAXIS_SECOND = 2;//7天的线,需要drawText
public static final int TYPE_XAXIS_THIRD = 3;//最小刻度的线
public static final int TYPE_XAXIS_SPECIAL = 4;//同时是月线以及7日分隔线
public long timestamp;
public int type;
public LocalDate localDate;
例如,绘制一天步数的一个图表,每半小时一根柱子,一共48根BarChart, 其中要 0点、6点、12点、18点、24点要显示X轴坐标,则以上几个位置对应的type值设置为 TYPE_XAXIS_SECOND, 普通的设置为 TYPE_XAXIS_THIRD, 一般的设置为 TYPE_XAXIS_THIRD,在创建Recycler开发者_JAVA教程Entry 的list绑定到Adapter的时候设定。绘制X轴时,drawLine 以及drawLabel 都会依照这个 Entry里的Type来设定,具体绘制相关的Color、size、position等都设定在 BaseAttrs 中, 例如一下绘制X轴的网格线:
//绘制网格 纵轴线
    final public void drawVerticalLine(Canvas canvas, RecyclerView parent, XAxis xAxis) {
        if (!mBarChartAttrs.enableXAxisGridLine){
            return;
        }
        BaseBarChartAdapter mAdapter = (BaseBarChartAdapter) parent.getAdapter();
        List<BarEntry> entries = mAdapter.getEntries();
        int parentTop = parent.getPaddingTop();
        int parentBottom = parent.getHeight() - parent.getPaddingBottom();
        int parentLeft = parent.getPaddingLeft();
        final int childCount = parent.getChildCount();
        mTextPaint.setTextSize(xAxis.getTextSize());
        int parentRight = parent.getWidth() - parent.getPaddingRight();
        for (int i = 0; i < childCount; i++) {
            final View child = parent.getChildAt(i);
            injst adapterPosition = parent.getChildAdapterPosition(child);
            if (adapterPosition == RecyclerView.NO_POSITION){
                continue;
            }
            int type = parent.getAdapter().getItemViewType(adapterPosition);
            final int x = child.getRight();
            if (x > parentRight || x < parentLeft) {//超出的时候就不要画了
                continue;
            }
            if (type == BarEntry.TYPE_XAXIS_FIRST || type == BarEntry.TYPE_XAXIS_SPECIAL) {
                if (mBarChartAttrs.enableXAxisFirstGridLine){
                    boolean isNextSecondType = isNearEntrySecondType(entries, xAxis, child.getWidth(), adapterPosition);
                    mLinePaint.setColor(xAxis.firstDividerColor);
                    Path path = new Path();
                    if (isNextSecondType) {
                        path.moveTo(x, parentBottom - mBarChartAttrs.contentPaddingBottom);
                    } else {
                        path.moveTo(x, parentBottom);
                    }
                    path.lineTo(x, parentTop);编程
                    canvas.drawpath(path, mLinePaint);
                }
            } elsjse if (type == BarEntry.TYPE_XAXIS_SECOND) {
                if (mBarChartAttrs.enableXAxisSecondGridLine){
                    //拿到child 的布局信息
                    PathEffect pathEffect = new DashPathEffect(new float[]{5, 5, 5, 5}, 1);
                    mDashPaint.setPathEffect(pathEffect);
                    mDashPaint.setColor(xAxis.secondDividerColor);
                    Path path = new Path();
                    path.moveTo(x, parentBottom - DisplayUtil.dip2px(1));
                    path.lineTo(x, parentTop);
                    canvas.drawPath(path, mDashPaint);
                }
            } else if (type == BarEntry.TYPE_XAXIS_THIRD) {
                if (mBarChartAttrs.enableXAxisThirdGridLine){
                    //拿到child 的布局信息。 绘制同上。
                    。。。
                    canvas.drawPath(path, mDashPaint);
                }
            }
        }
    }
关于XAxis 坐标的绘制,通过ValueFormatter 来获取Label,这样可以将Label的文本内容显示交给设定ValueFormatter的提供者,ValueFormatter借用的MPChart里的概念。这里通过每个Entry中的type属性以及x, timestamp等相关属性,自己的需求来控制Label.
//绘制X坐标
    final public void drawXAxis(Canvas canvas, RecyclerView parent, XAxis xAxis) {
        if (!mBarChartAttrs.enableXAxisLabel){
            return;
        }
        int parentBottom = parent.getHeight() - parent.getPaddingBottom();
        int parentLeft = parent.getPaddingLeft();
        final int childCount = parent.getChildCount();
        mTextPaint.setTextSize(xAxis.getTextSize());
        int parentRight = parent.getWidth() - parent.getPaddingRight();
        for (int i = 0; i < childCount; i++) {
            final View child = parent.getChildAt(i);
            final int xLeft = child.getLeft();
            final int xRight = child.getRight();
            BarEntry barEntry = (BarEntry) child.getTag();
            String dateStr = xAxis.getValueFormatter().getBarLabel(barEntry);
            if (!TextUtils.isEmpty(dateStr)) {
                int childwidth = child.getWidth();
                float txtWidth = mTextPaint.measureText(dateStr);
                float txtXLeft = 0;
                float txtY = parentBottom - DisplayUtil.dip2px(1);
                if (childWidth > txtWidth) {//柱状图的宽度比较大的时候,文字居中
                    float distance = childWidth - txtWidth;
                    txtXLeft = xLeft + distance / 2;
                } else {
                    txtXLeft = xRight - xAxis.labelTxtPadding - txtWidth;
                }
                float txtXRight = txtXLeft + txtWidth;
                int length = dateStr.length();
                if (DecimalUtil.bigOrEquals(txtXLeft, parentLeft) && DecimalUtil.smallOrEquals(txtXRight, parentRight)) {//中间位置
                    canvas.drawText(dateStr, txtXLeft, txtY, mTextPaint);
                } else if (txtXLeft < parentLeft && txtXRight > parentLeft) {//处理左边界
编程客栈                    int displayLength = (int) ((txtXRight - parentLeft) / txtWidth * length);
                    int index = length - displayLength;
                    canvas.drawText(dateStr, index, length, parentLeft, txtY, mTextPaint);
                } else if (txtXRight > parentRight && txtXLeft < parentRight) {//处理右边界
                    int displayLength = (int) ((parentRight - txtXLeft + 1) / txtWidth * length);
                    int endIndex = displayLength;
                    if (endIndex < length) {
                        endIndex += 1;
                    }
                    canvas.drawText(dateStr, 0, endIndex, txtXLeft, txtY, mTextPaint);
                }
            }
        }
    }
2. Y轴的绘制
Y轴的具体 Left、Right的绘制可以根据ChartAttrs中的设置来控制具体显示哪一种。上面有提到X/Y/Board的绘制会受RecyclerView中的padding来限制绘制的区域大小,然后具体的Y轴网格线绘制几格,每格的Label显示均由YAxis来控制,特殊的需求也支持自定义,之前有介绍过MPChart图表中Y轴的这个计算,需要跟具体的业务数据相关联。得到了YAxis的labelCount 以及具体的Label List 之后,绘制就非常简单了。
//绘制 Y轴刻度线 横的网格线
    public void drawHorizontalLine(Canvas canvas, RecyclerView parent, T yAxis) {
        int left = parent.getPaddingLeft();
        int right = parent.getWidth() - parent.getPaddingRight();
        mLinePaint.setColor(yAxis.getGridColor());
        int top = parent.getPaddingTop();
        int bottom = parent.getHeight() - parent.getPaddingBottom();
        float distance = bottom - mBarChartAttrs.contentPaddingBottom - mBarChartAttrs.contentPaddingTop - top;
        int lineNums = yAxis.getLabelCount();
        float lineDistance = distance / lineNums;
        float gridLine = top + mBarChartAttrs.contentPaddingTop;
        for (int i = 0; i <= lineNums; i++) {
            if (i > 0) {
                gridLine = gridLine + lineDistance;
            }
            Path path = new Path();
            path.moveTo(left, gridLine);
            path.lineTo(right, gridLine);
            boolean enable = false;
            if (i == lineNums && mBarChartAttrs.enableYAxisZero) {
                enable = true;
            } else {
                enable = mBarChartAttrs.enableYAxisGridLine;//允许画 Y轴刻度
            }
            if (enable) {
                canvas.drawPath(path, mLinePaint);
            }
        }
    }
绘制RightYAxisLabel
//绘制右边的刻度
    public void drawRightYAxisLabel(Canvas canvas, RecyclerView parent, T yAxis) {
        if (mBarChartAttrs.enableRightYAxisLabel) {
            int right = parent.getWidth();
            int top = parent.getPaddingTop();
            int bottom = parent.getHeight() - parent.getPaddingBottom();
            mTextPaint.setTextSize(yAxis.getTextSize());
            String longestStr = yAxis.getLongestLabel();
            float yAxisWidth = mTextPaint.measureText(longestStr) + mBarChartAttrs.recyclerPaddingRight;
            int paddingRight = computeYAxisWidth(parent.getPaddingRight(), yAxisWidth);
            //设置 recyclerView的 BarChart 内容区域
            parent.setPadding(parent.getPaddingLeft(), parent.getPaddingTop(), paddingRight, parent.getPaddingBottom());
            float topLocation = top + mBarChartAttrs.contentPaddingTop;
            float containerHeight = bottom - mBarChartAttrs.contentPaddingBottom - topLocation;
            float itemHeight = containerHeight / yAxis.getLabelCount();
          //通过YAxis获取 具体的label List.
            HashMap<Float, Float> yAxisScaleMap = yAxis.getYAxisScaleMap(topLocation, itemHeight, yAxis.getLabelCount());
            float txtX = right - parent.getPaddingRight() + yAxis.labelHorizontalPadding;
            for (Map.Entry<Float, Float> entry : yAxisScaleMap.entrySet()) {
                float yAxisScaleLocation = entry.getKey();
                float yAxisScaleValue = entry.getValue();
                String labelStr = yAxis.getValueFormatter().getFormattedValue(yAxisScaleValue);
                float txtY = yAxisScaleLocation + yAxis.labelVerticalPadding;
                canvas.drawText(labelStr, txtX, txtY, mTextPaint);
            }
        }
    }
3. Board 绘制
Board的绘制相对而言就简单了,只需根据mBarChartAttrs 中的属性值,以及RecyclerView的padding值,以及绘制颜色背景等绘制即可。
final public void drawBarBorder(@NonNull Canvas canvas, @NonNull RecyclerView parent) {
    if (mBarChartAttrs.enableBarBorder) {
      RectF rectF = new RectF();
      float start = parent.getPaddingLeft();
      float top = parent.getPaddingTop();
      float end = parent.getRight() - parent.getPaddingRight();
      //底部有0的刻度是不是不用画,就画折线了。
      float bottom = parent.getHeight() - parent.getPaddingBottom() javascript- mBarChartAttrs.contentPaddingBottom;
      rectF.set(start, top, end, bottom);
      mBarBorderPaint.setStrokeWidth(mBarChartAttrs.barBorderWidth);
      canvas.drawRect(rectF, mBarBorderPaint);
    }
}
至此本章节介绍完毕,相对而言还是比较简单的,YAxis中的label 的计算等,可以参考我代码里面的Case。
以上就是android开发X Y轴Board的绘制教程示例的详细内容,更多关于Android Board绘制X Y轴的资料请关注我们其它相关文章!





 加载中,请稍侯......
精彩评论