目录
- MyBATis代码生成器Mybatis-Generator的配置和使用
- 首先我们有一个建好的现成项目
- 重点
- 总结
MyBatis代码生成器Mybatis-Generator的配置和使用
- 注:项目介绍
- 编译器:Intellij IDEA
- 项 目:SpringBoot项目
讲道理现在MyBatis-plus出来了。省去了再写许多繁琐的XML文件。也大大简化了开发压力。类似于SpringData-JPA(也挺好用的)。MyBatis-plus也有相关的代码生成器。后面有时间博主再去踩一下回来再整理。
首先我们有一个建好的现成项目
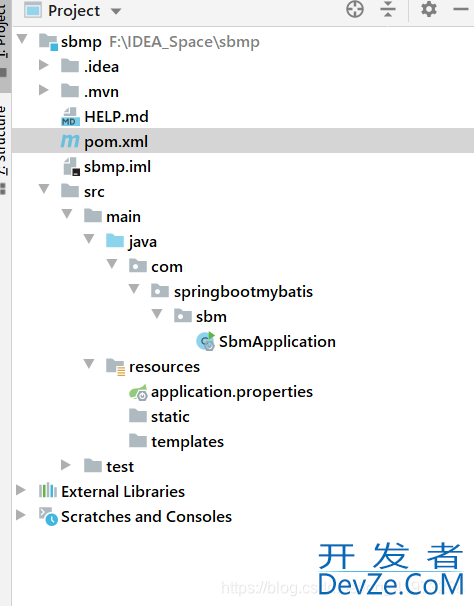
可以看到什么都还没有加进去,那我们就从连接数据库到代码自动生成演示一下。
使用Mybatis-Generator
1、首先我们要添加一个配置文件,这个也是最关键的文件。
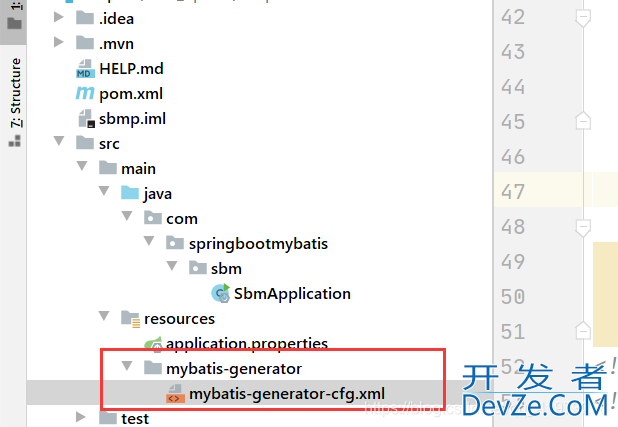
配置文件代码:mybatis-generator-cfg.xml
<?xml version="1.0" encoding="UTF-8"?>
<!DOCTYPE generatorConfiguration
		PUBLIC "-//mybatis.org//DTD MyBatis Generator Configuration 1.0//EN"
		"http://mybatis.org/dtd/mybatis-generator-config_1_0.dtd">
<generatorConfiguration>
	<properties resource="application.yml"></properties>
	<classPathEntry location="F:\apache-maven-3.5.4\LocalHouse\mysql\mysql-connector-Java\5.1.46\mysql-connector-java-5.1.46.jar"/>
	<context id="test" targetRuntime="MyBatis3">
		<plugin type="org.mybatis.generator.plugins.EqualsHashCodePlugin"></plugin>
		<plugin type="org.androidmybatis.generator.plugins.SerializablePlugin"></plugin>
		<plugin type="org.mybatis.generator.plugins.ToStringPlugin"></plugin>
		<commentGenerator>
			<!-- 这个元素用来去除指定生成的注释中是否包含生成的日期 false:表示保护 -->
			<!-- 如果生成日期,会造成即使修改一个字段,整个实体类所有属性都会发生变化,不利于版本控制,所以设置为true -->
			<property name="suppressDate" value="true" />
			<!-- 是否去除自动生成的注释 true:是 : false:否 -->
			<property name="suppressAllComments" value="false" />
		</commentGenerator>
		<!--数据库链接URL,用户名、密码 -->
		<jdbcConnection driverClass="com.mysql.jdbc.Driver"
						connectionURL="jdbc:mysql://localhost/demo"
						userId="root"
						password="123456">
		</jdbcConnection>
		<javaTypeResolver>
			<!-- This property is used to specify whether MyBatis Generator shouldjs
                force the use of java.math.BigDecimal for DECIMAL and NUMERIC fields, -->
			<property name="forceBigDecimals" value="false" />
		</javaTypeResolver>
		 <!-- targetpakage是即将生成的目录,targetProject是对应的前缀目录。可根据自己需求生到对应目录。下次运行会直接默认覆盖原来位置的文件 -->
		<!-- 生成模型的包名和位置   映射实体类的位置 -->
		<javaModelGenerator targetPackage="com.sbproject.sb.common.model"
							targetProject="src/main/java">
			<property name="enableSubPackages" value="true" />
			<property name="trimStrings" value="true" />
		</javaModelGenerator>
		<!-- 生成映射文件的包名和位置  mapper.xml -->
		<sqlMapGenerator targetPackage="com.sbproject.sb.common.dao.mapper"
						 targetProject="src/main/java">
			<property name="enableSubPackages" value="true" />
		</sqlMapGenerator>
		<!-- 生成DAO的包名和位置   mapper接口-->
		<javaClientGenerator type="XMLMAPPER" targetPackage="com.sbproject.sb.common.dao"
							 targetProject="src/main/java">
			<property name="enableSubPackages" value="true" />
		</javaClientGenerator>

		<!-- 要生成哪些表  orders是我的表名,Orders是生成的类名,比如我的映射类为Order,映射接口OrderMapper, 映射文件为OrderMapper.xml,可以添加多个表,里面的几个配置大概意思就是是否允许生成example文件和支持selectByExample。用过Mybatis的应该知道selectByExample,对于一些简单查询用这个还是比较方便的。哈哈、话有点多,记得删除 -->
		<table tableName="orders" domainObjectName="Orders"
			   enableCountByExample="true" enableUpdateByExample="true"
			   enableDeleteByExample="true" enableSelectByExample="trwww.devze.comue"
			   selectByExampleQueryId="true"></table>
		<!-- 要生成哪些表  -->
		<table tableName="products" domainObjectName="Products"
			   enableCountByExample="true" enableUpdateByExample="true"
			   enableDeleteByExample="true" enableSelectByExample="true"
			   selectByExampleQueryId="true"></table>
	</context>
</generatorConfiguration>
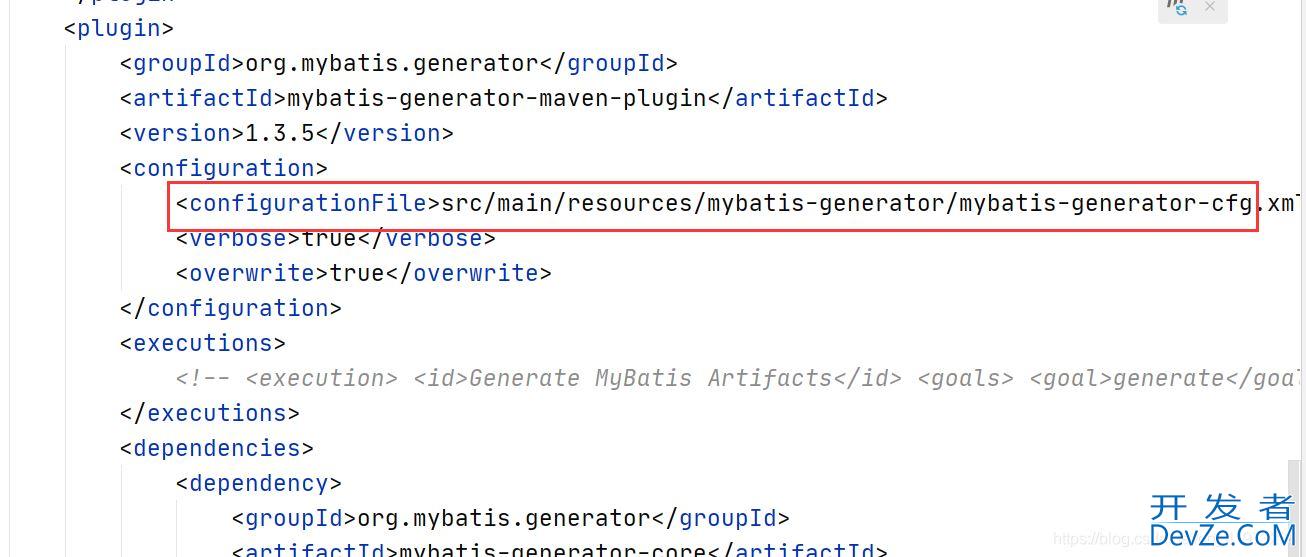
2、其次就是pom里面添加配置,加载plugins里面!
注:红圈的路径对应的就是刚才添加的配置文件。
<plugin>
                <groupId>org.mybatis.generator</groupId>
                <artifactId>mybatis-generator-maven-plugin</artifactId>
                <version>1.3.5</version>
                <configuration>
                    <configurationFile>src/main/resources/mybatis-generator/mybatis-generator-cfg.xml</configurationFile>
                    <verbose>true</verbose>
                    <overwrite>true</overwrite>
                </configuration>
                <executions>
                    <!-- <execution> <id>Generate MyBatis Artifacts</id> <goals> <goal>generate</goal&BHRuoKgt; </goals> </execution> -->
                </executions>
                <dependencies>
                    <dependency>
                        <groupId>org.mybatis.generator</groupId>
                        <artifactId>mybatis-generator-core</artifactId>
                        <version>1.3.5</version>
                    </dependency>
                </dependencies>
            </plugin>
3、添加运行配置、运行文件(对了记得吧application.properties后缀改为yml。
不然会找不到yml。或者在之前的那个配置文件把yml改为properties,都可以。)
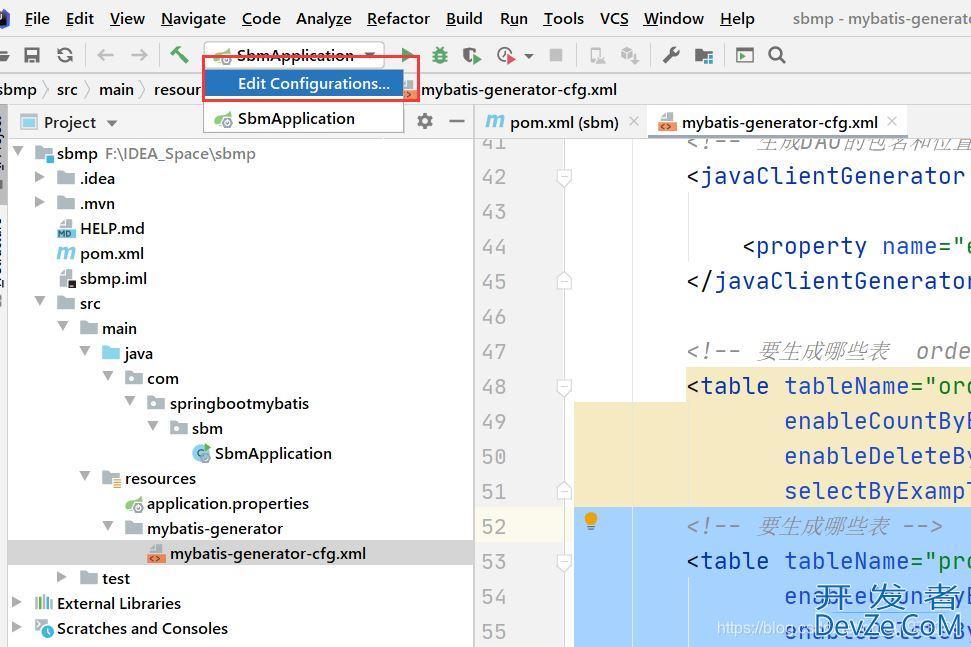
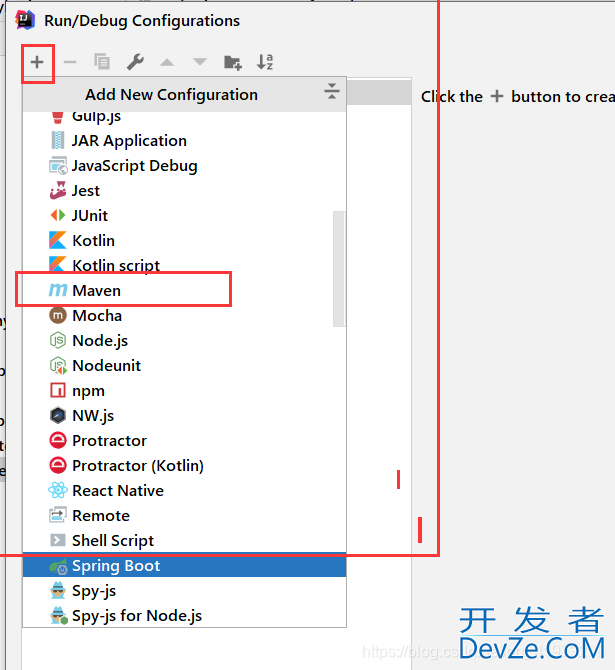
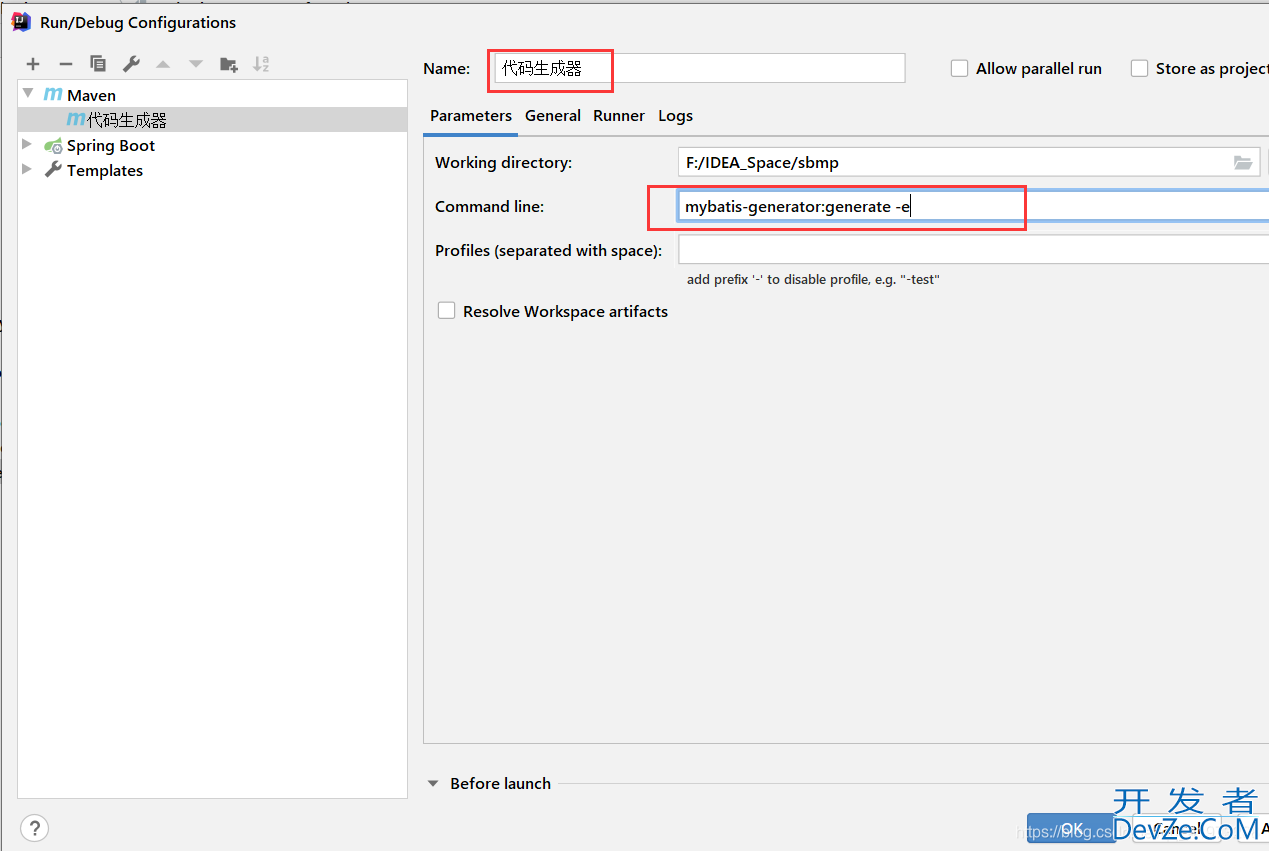
懒人专用:请copy
mybatis-generator:generate -e
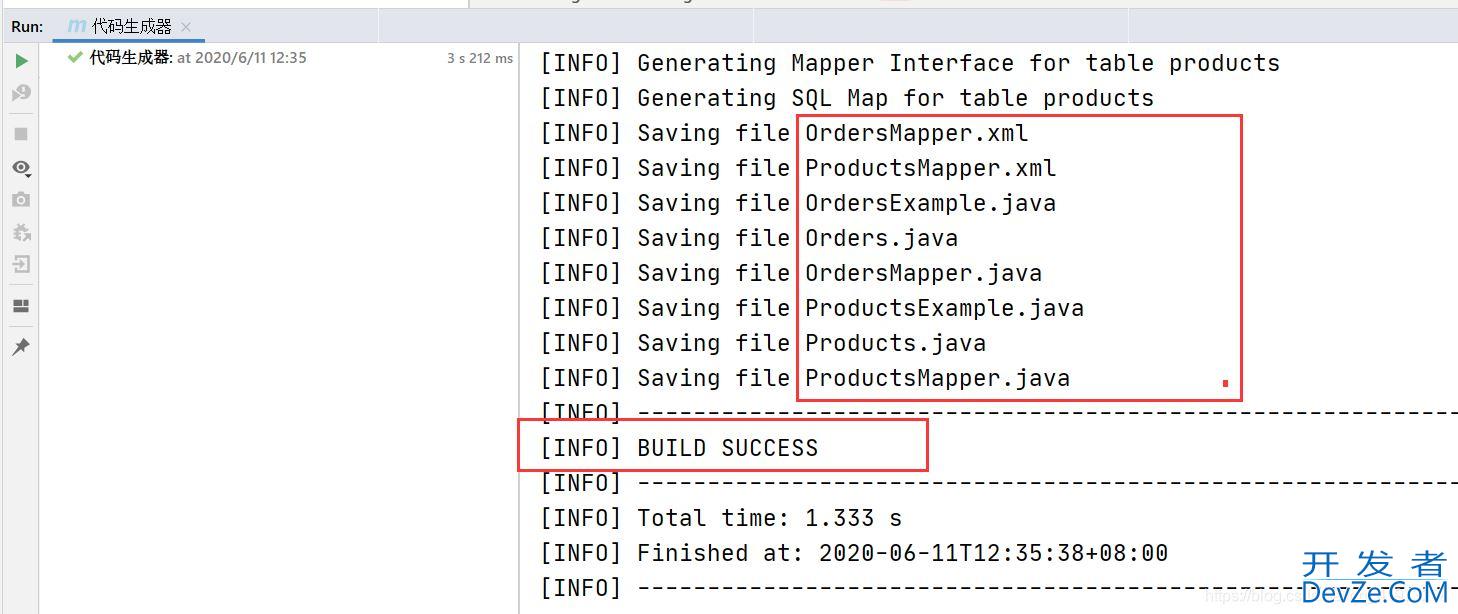
4、选中刚才配置的直接运行就ok了。是不是很简单。
由于Mybatis要写很多很多的xml文件、和Sql语句。这个代码生成器会直接生成诸多常用的增删查改。
看到以下提示、说明你很幸运,直接成功了。你可真是太优秀了!博主开始用的时候可是遇到了太多的坑了。
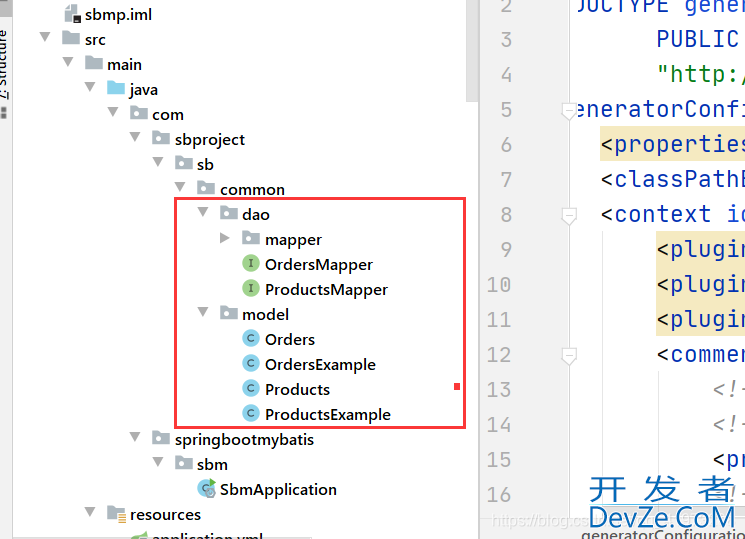
我们再到刚才配置生成的路径下看看文件。已经帮我们直接生成了我们想要的基础文件。
随便例举一个Mapper接口吧, 为了让大家更直观的看到、我把后面自动生成的注释删了。
注释的作用主要用于表格变动之类需要再次生成时识别是否为自动生成的代码(比如第一个countByExample)。会默认覆盖自动生成的代码。
没有注释的会保留下来。:
public interface OrdersMapper {
   /**
     * This method was generated by MyBatis Generator.
     * This method corresponds to the database table orders
     *
     * @mbg.generated
     */
    long countByExample(OrdersExample example);

    int deleteByExample(OrdersExample example);

    int deleteByPrimaryKey(String id);

    int insert(Orders record);

    int insertSelective(Orders record);

    List<Orders> selectByExample(OrdersExample example);

    Orders selectByPrimaryKey(String id);

    int updateByExampleSelective(@Param("record") Orders record, @Param("example") OrdersExample example);

    int updateByExample(@Param("record") Orders record, @Param("example") OrdersExample example);

    int updateByPrimaryKeySelective(Orders record);

    int updateByPrimaryKey(Orders record);
}
重点
以下提几点需要注意的问题。
1、注意mysql的版本问题,不能超过5 。
博主遇到过问题超过五就报错。太久了忘了记录了。跟我一样选一样默认依赖。
新建SpringBoot项目后MySql-Connector默认是8.几。
所以加一个版本号就行。

2、配置文件里面的连接依赖和项目配置的依赖路径一致。
不然也会报错。
可直接右键jar包->find in path -> copy路径到右边配置文件对应位置即可。
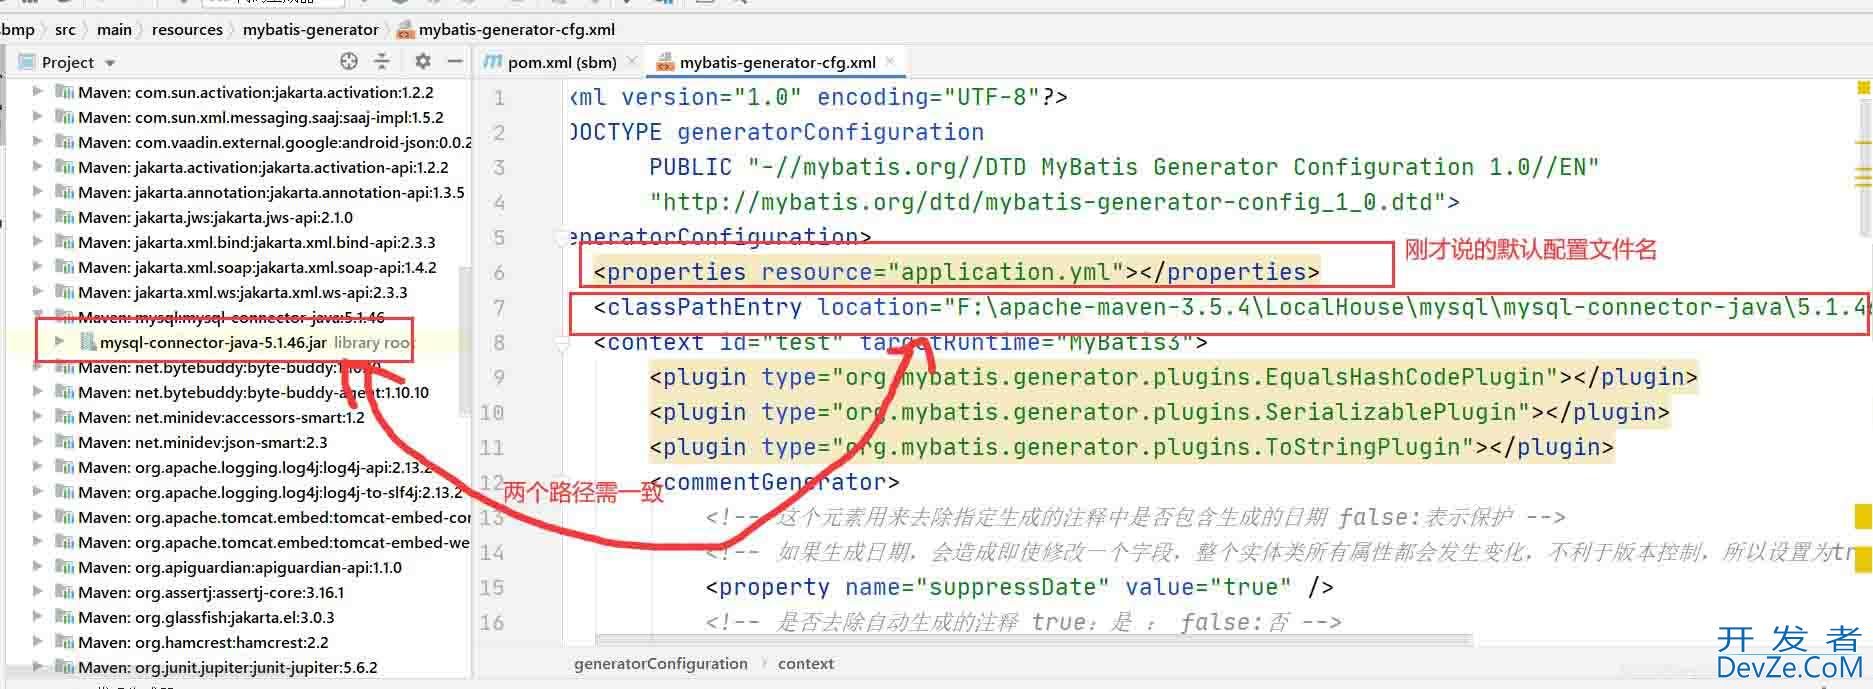
3、还是开始提的pom里面的generator.xml路径一定要配对。
最后就附上我的pom.xml文件吧
<?xml version="1.0" encoding="UTF-8"?>
<project xmlns="http://maven.apache.org/POM/4.0.0" xmlns:xsi="http://www.w3.org/2001/XMLSchema-instance"
         xsi:schemaLocation="http://maven.apache.org/POM/4.0.0 https://maven.apache.org/xsd/maven-4.0.0.xsd">
    <modelVersion>4.0.0</modelVersion>
    <parent>
        <groupId>org.springframework.boot</groupId>
        <artifactId>spring-boot-starter-parent</artifactId>
        <version>2.3.0.RELEASE</version>
        <relativePath/> <!-- lookup parent from repository -->
    </parent>
    <groupId>com.springbootMybatis</groupId>
    <artifactId>sbm</artifactId>
    <version>0.0.1-SNAPSHOT</version>
    <name>sbm</name>
    <description>Demo project for Spring Boot</description>

    <properties>
        <java.version>1.8</java.version>
    </properties>

    <dependencies>
        <dependency>
            <groupId>org.springframework.boot</groupId>
            <artifactId>spring-boot-starter-web</artifactId>
        </dependency>
        <dependency>
            <groupId>org.springframework.data</groupId>
            <artifactId>spring-data-commons</artifactId>
        </dependency>
        <dependency>
            <groupId>org.springframework.boot</groupId>
            <artifactId>spring-boot-starter-web-services</arhttp://www.devze.comtifactId>
        </dependency>

        <dependency>
            <groupId>mysql</groupId>
            <artifactId>mysql-connector-java</artifactId>
            <version>5.1.46</version>
            <scope>runtime</scope>
        </dependency>
        <dependency>
            <groupId>org.projectlombok</groupId>
            <artifactId>lombok</artifactId>
            <optional>true</optional>
        </dependency>
        <dependency>
            <groupId>org.springframework.boot</groupId>
            <artifactId>spring-boot-starter-test</artifactId>
            <scope>test</scope>
            <exclusions>
                <exclusion>
                    <groupId>org.junit.vintage</groupId>
                    <artifactId>junit-vintage-engine</artifactId>
                </exclusion>
            </exclusions>
        </dependency>
        <dependency>
            <groupId>org.springframework.data</groupId>
            <artifactId>spring-data-commons</artifactId>
            <version>2.1.5.RELEASE</version>
        </dependency>
    </dependencies>

    <build>
        <plugins>
            <plugin>
                <groupId>org.springframework.boot</groupId>
                <artifactId>spring-boot-maven-plugin</artifactId>
            </plugin>
            <plugin>
                <groupId>org.mybatis.generator</groupId>
                <artifactId>mybatis-generator-maven-plugin</artifactId>
                <version>1.3.5</version>
                <configuration>
                    <configurationFile>src/main/resources/mybatis-generator/mybatis-generator-cfg.xml</configurationFile>
                    <verbose>true</verbose>
                    <overwrite>true</overwrite>
                </configuration>
                <executions>
                </executions>
                <dependencies>
                    <dependency>
                        <groupId>org.mybatis.generator</groupId>
                        <artifactId>mybatis-generator-core</artifactId>
                        <version>1.3.5</version>
                    </dependency>
                </dependencies>
            </plugin>
        </plugins>
    </build>

</project>
注:此博客基础博客。博主比较菜。常用的是SSM,这个是博主搭建SpringBoot测试项目的时候记录的。可能不是很规范,望见谅。
总结
以上为个人经验,希望能给大家一个参考,也希望大家多多支持编程客栈(www.devze.com)。



 加载中,请稍侯......
精彩评论