目录
- 第一步:
- 第二步:
- 第三步:
- 第四步:
一个SpringBoot项目,同时连接两个数据库:比如一个是mysql数据库,一个是oracle数据库(啥数据库都一样,连接两个同为oracle的数据库,或两个不同的数据库,只需要更改对应的driver-class-name和jdbc-url等即可)注意:连接什么数据库,要引入对应数据库的包。
第一步:
导入pom
<androiddependency>
    <groupId>com.alibaba</groupId>
    <artifactId>druid</artifactId>
    <version>1.1.0</version>
</dependency>

<dependency>
    <groupId>mysql</groupId>
    <artifactId>mysql-connector-Java</artifactId>
    <scope>runtime</scope>
</dependency>
第二步:
修改application.yml配置文件(我采用本地的,IP地址是一致的,实际开发中,是两台云服务,两台MySQL地址进行主从读写)
    mysql1:
      driver-class-name: com.mysql.cj.jdbc.Driver
      jdbcUrl: jdbc:mysql://localhost:3306/test?useSSL=false&useUnicode=true&characterEncoding=UTF-8&serverTimezone=GMT%2B8
      username: "root"
      password: "12345678"
      type: com.alibaba.druid.pool.DruidDataSource
 js   mysql2:
      driver-class-name: com.mysql.cj.jdbc.Driver
      jdbcUrl: jdbc:mysql://localhost:3306/test1?useSSL=false&useUnicode=true&characterEncoding=UTF-8&serverTimezone=GMT%2B8
      username: "root"
      password: "12345678"
      type: com.alibaba.druid.pool.DruidDataSource

注意格式上面spring.datasource省略了
第三步:
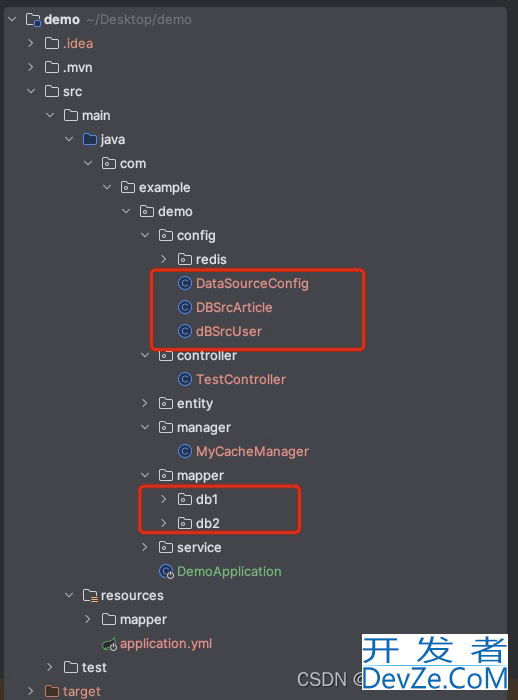
建造配置类:
(1)第一个库配置信息:/**
* 数据库leadnews_article
*/
@Configuration
@MapperScan(basePackages = {"com.example.demo.mapper.db1"}, sqlSessionFactoryRef = "sqlSessionFactoryArticle")
public class DBSrcArticle {
@Bean
public SqlSessionFactory sqlSessionFactoryArticle(@Qualifier("mysql1") DataSource dataSource) throws Exception {
MyBATisSqlSessionFactoryBean sqlSessionFactory = new MybatisSqlSessionFactoryBean();
sqlSessionFactory.setDataSource(dataSource);
sqlSessionFactory.setMapperlocations(new PathMatchingResourcePatternResolver()
.getResources("classpath:mapper/db1/*.XML"));
return sqlSessionFactory.getObject();
}
@Bean
public SqlSessionTemplate sqlSessionTemplateArticle(@Qualifier("sqlSessionFactoryArticle") SqlSessionFactory sqlSessionFactory) throws Exception {
return new SqlSessionTemplate(sqlSessionFactory);
}
}
(2)第二个库配置
/**
 * 数据库leadnews_user
 */
@Configuration
@MapperScan(basePackages = {"com.example.demo.mapper.DB2"}, sqlSessionFactoryRef = "sqlSessionFactoryUser")
public class dBSrcUser {
    @Bean
    @Primary
    public SqlSessionFactory sqlSessionFactoryUser(@Qualifier("mysql2") DataSource dataSource) throws Exception {
        MybatisSqlSessionFactoryBean sqlSessionFactory = new MybatisSqlSessionFactoryBean();
        sqlSessionFactory.setDataSource(dataSource);
        sqlSessionFactory.setMapperLocations(new PathMatchingResourcePatternResolver()
                .getResources("classpath:mapper/db2/*.xml"));
        return sqlSessionFactory.getObject();
    }

    @Bean
    @Primary
    public SqlSessionTemplate sqlSessionTemplateUser(@Qualifier("sqlSessionFactoryUser") SqlSessionFactory sqlSessionFactory) throws Exception {
        return new SqlSessionTemplate(sqlSessionFactory);
    }
}
(3)数据源配置:
/**
 * 数据源配置
 */
@Configuration
public class DataSourceConfig {
    @Primary
    @Bean(name = "mysql1")
    @ConfigurationProperties(prefix = "spring.datasource.mysql1")
    public DataSource dBSrcArticle() {
        return DataSourceBuilder.create().build();
    }

    @Primary
    @BeajwhglVmDn(name = "mysql2")
    @ConfigurationProperties(prefix = "spring.datasource.mysql2")
    public DataSource dBSrcUser() {
        return DataSourceBuilder.create().build();
    }
}
注意:连接两个以上的数据库,需要对mapper文件夹进行分包!
第四步:
在启动类中加上这三个注解:
@SpringBootApplication(exclude = {DataSourceAutoConfiguration.class})
@MapperScan(basePackages = {"com.example.demo.entity.db1"}, sqlSessionFactoryRef = "sqlSessionFactoryArticle")
@MapperScjsan(basePackages = {"com.example.demo.entity.db2"}, sqlSessionFactoryRef = "sqlSessionFactoryUser")
此时:已经可以访问两个数据库内容了。
到此这篇关于springboot连接多个库的实现方法的文章就介绍jwhglVmD到这了,更多相关springboot连接多个库内容请搜索编程客栈(www.devze.com)以前的文章或继续浏览下面的相关文章希望大家以后多多支持编程客栈(www.devze.com)!
 加载中,请稍侯......
精彩评论