目录
- jodconverter 简介
- 下载安装 libreoffice
- 代码演示
- 1、创建springboot项目工程并引入依赖
- 2、配置
- 3、准备一个docx模板
- 4、编写测试代码
- 运行后的样式
- linux 环境下安装 libreoffice
- 总结
公司项目开发中,早期使用docx4j进行word转pdf,出现了很多格式紊乱、空格缩进、字体间距变大等问题。
虽然针对空格缩进等处理,采取全角模式,进行了改善。但依旧还是会有很多解决不了的格式。
一直在找一种新的方式进行替代,主要是:保证显示格式。
jodconverter 简介
这是一款利用操作系统中的office库,实现文档类型转换的工具。目前支持很多格式间的互相转换。
- 这里不做太多的阐述,度娘、论坛等都有很多博客的说明。
- 本次只是为了基本的测试与使用。
下载安装 libreoffijsce
libreoffice 下载地址
根据电脑对应的系统,选择指定系统版本的进行安装即可。
本次以Windows进行演示,后期会增加linux的安装脚本。
代码演示
1、创建springboot项目工程并引入依赖
本次测试代码,结合docx模板数据填入的思想,进行doc文件内容填充,并将doc文件转换pdf处理。
往期回顾:根据docx填充生成word文件,并导出pdf
所以需要导入以下依赖:
<!-- docx 模板填入与导出doc -->
<dependency>
    <groupId>com.deepoove</groupId>
    <artifactId>poi-tl</artifactId>
    <version>1.5.0</version>
</dependency>

<!-- libreoffice 进行文件转换 -->
<dependency>
    <groupId>org.jodconverter</groupId>
    <artifactId>jodconverter-spring-boot-starter</artifactId>
    <version>4.4.4</version>
</dependency>
<dependency>
    <groupId>org.jodcwww.devze.comonverter</groupId>
    <artifactId>jodconverter-local</artifactId>
    <version>4.4.4</version>
</dependency>编程客栈;
2、配置
除了增加对应依赖文件之外,还需要增加application.properties文件的配置。
如下所示:
server.port=80

jodconverter.local.enabled=true
# libreOffice根目录
jodconverter.local.office-home=C:/Program Files/LibreOffice
# 任务执行的超时时间
jodconverter.local.task-execution-timeout=86400000
# 任务队列的超时时间
jodconverter.local.task-queue-timeout=86400000
# 端口(线程)
jodconverter.local.port-numbers=2001,2002,2003
# 一个进程的超时时间
jodconverter.local.process-timeout=86400000
3、准备一个docx模板

并放置于resources/templates_report下,如下所示:

4、编写测试代码
如下所示:
package cn.xj.controller;
import com.deepoove.poi.XwpFTemplate;
import lombok.extern.slf4j.Slf4j;
import org.jodconverter.core.DocumentConverter;
import org.jodconverter.core.document.DefaultDocumentFormatRegistry;
import org.jodconverter.core.office.OfficeException;
import org.springframework.beans.factory.annotation.Autowired;
import org.springframework.core.io.ClassPathResource;
import org.springframework.core.io.Resource;
import org.springframework.web.bind.annotation.RequestMapping;
import org.springframework.web.bind.annotation.RestController;
import Java.io.File;
import java.io.FileOutputStream;
import java.io.IOException;
import java.io.OutputStream;
import java.util.HashMap;
import java.util.Map;
@Slf4j
@RestController
@RequestMapping("/pdf")
public class TestController {
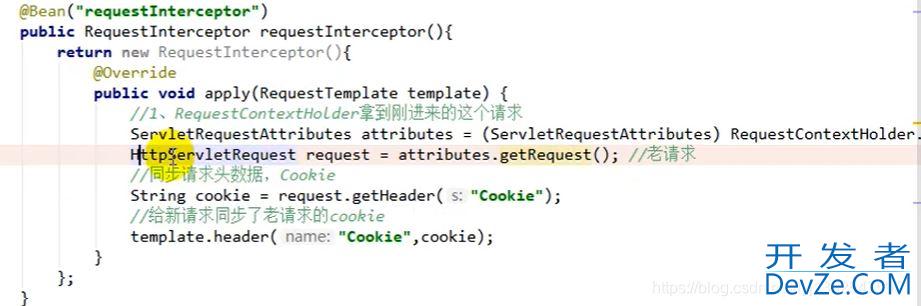
@Autowired
private DocumentConverter documentConverter;
@RequestMapping("/test")
publihttp://www.devze.comc void test() throws IOException {
Map<String, Object> params = new HashMap<>();
params.put("username","xiangjiao1");
params.put("password","******");
params.put("age",22);
params.put("email","专注写bug测试中文");
Resource resource = new ClassPathResource("templates_report/001.docx");
File file = resource.getFile();
// 数据填充
XWPFTemplate template = XWPFTemplate.compile(file).render(params);
String docOutPath = System.getProperty("user.dir")+File.separator+"springboot-poi"+File.separator+"pdf"+File.separator+System.currentTimeMillis()+ ".doc";
OutputStream outputStream = new FileOutputStream(docOutPath);
template.write(outputStream);
try {
String pdfOutPath = System.getProperty("user.dir")+File.separator+"springboot-poi"+File.separator+"pdf"+File.separator+System.currentTimeMillis()+".pdf";
documentConverter.convert(new File(docOutPath)).to(new File(pdfOutPath)).as(DefaultDocumentFormatRegistry.PDF).execute();
} catch (OfficeException e) {
log.error("文档转换异常:{}", e.getMessage());
}
}
}
运行后的样式


linux 环境下安装 libreoffice
脚本如下所示:
#!/bjavascriptin/bash
cd /tmp

install_RedHat() {
   wget https://kkfileview.keking.cn/LibreOffice_7.3.7_Linux_x86-64_rpm.tar.gz -cO LibreOffice_7_rpm.tar.gz && tar -zxf /tmp/LibreOffice_7_rpm.tar.gz && cd /tmp/LibreOffice_7.3.7.2_Linux_x86-64_rpm/RPMS
   echo $?
   if [ $? -eq 0 ];then
     yum install -y libSM.x86_64 libXrender.x86_64  libXext.x86_64
     yum groupinstall -y  "X Window System"
     yum localinstall -y *.rpm
     echo 'install finshed...'
   else
     echo 'download package error...'
   fi
}

install_Ubuntu() {
   wget  https://kkfileview.keking.cn/LibreOffice_7.3.7_Linux_x86-64_deb.tar.gz  -cO LibreOffice_7_deb.tar.gz && tar -zxf /tmp/LibreOffice_7_deb.tar.gz && cd /tmp/LibreOffice_7.3.7.2_Linux_x86-64_deb/DEBS
   echo $?
 if [ $? -eq 0 ];then
     apt-get install -y libxinerama1 libcairo2 libcups2 libx11-xcb1
     dpkg -i *.deb
     echo 'install finshed...'
  else
    echo 'download package error...'
 fi
}


if [ -f "/etc/redhat-release" ]; then
  yum install -y wget
  install_redhat
else
  apt-get install -y wget
  install_ubuntu
fi
总结
以上为个人经验,希望能给大家一个参考,也希望大家多多支持编程客栈(www.devze.com)。


 加载中,请稍侯......
精彩评论