目录
- python接口自动化之token传入到header消息头中
- python接口自动化之token的处理
- 提取token
- 结合框架使用token
- 总结
python接口自动化之token传入到header消息头中
(1)创建登录请求获取token
#登录界面的测试用例类
#导入日志类便于设置日志信息
from Logs.Log import Logger
#导入配置文件类读取公共数据
from Readini.Read import Readini
#导入excel类便于读取excel中的数据
from DataExcel.readExcel import ExcelUtil
#导入request包
import requests
import json
from Public.PageObject import SendRequest
#导入json包
import unittest
import jandroidson
from builtins import str
#设置读取登录中相关参数
excel = ExcelUtil(Readini().get_ini_value('Excel','exccelini')).dict_data()
def  token():
    #设置消息头信息
     header=eval(excel[0]['header'])
     # 设置url数据
     url = excel[0]['Url']
    #设置参数信息
     param=excel[0]['payload']
     # 将设置的参数信息转换为json格式的数据
     #设置请求类型
     type=excel[0]['Method']
    #发送post登录请求
     response=SendRequest().send_request(type,url,data=param,header=header)
     #获取token数据
     token=response.json()['data']['Access_token']
     #将token数据转换为字符串的格式
     return str(token)
(2)创建unittest公共初始化类并传入获取的token数据
from selenium import webdriver
import unittest
#创建unitest初始化公共类
from Logs.Log import Logger
log=Logger('接口自动化执行结果').getlog()
from TOKEN.PublicToken import token
import json
class TestBase(unittest.TestCase):
    #接口初始化开始
    @classmethod
    def setUpClass(cls):
        log.info('接口自动化测试开始')
        #传入获取的token作为初始化的token数据
        cls.token=token()
    #接口初始化结束
    @classmethod
    def tearDownClass(cls):
        log.info('接口自动化测试结束')
if __name__ == '__main__':
    unittest.main() #主函数  用于执行编写好的程序
(3)向header中传入初始化时获取的token
导入日志类便于设置日志信息
from Logs.Log import Logger
#导入配置文件类读取公共数据
from Readini.Read import Readini
#导入excel类便于读取excel中的数据
from DataExcel.readExcel import ExcelUtil
#设置读取登录中相关参数
excel = ExcelUtil(Readini().get_ini_value('Excel','exccelini')).dict_data()
#设置日志类型参数
log = Logger('登录接口日志执行结果').getlog()
#继承unittest初始化类
from ChanDao.TestBase import TestBase
#导入request包
import requests
from Public.PageObject import SendRequest
#导入json包
import unittest
import json
from Readini.Read import Readini
class Pinlun(TestBase):
  def  test_1_pinglun_success(self):
     '''登录成功'''
    #设置消息头信息
     header=eval(Readini().get_ini_value('hepythonader','headers'))
     #eval(excel[0]['header'])
     #像headers头中添加token信息
     header['Admin-Authorization']=self.token
     log.info(header)
     # 设置url数据
     url ='http://localhost:8090/api/admin/posts/comments'
     #log.info('退出的url地址是:' + url)
     #设置参数信息
     param={'page':'0','size':'10','keyword':'68'}
     # 将设置的参数信息转换为json格式的数据
    # log.info(param)
     #设置请求类型
     type='get'
     log.info(type)
    #发送get登录请求
     response=SendRequest().send_request(type,url,param,header=header)
     print(response.json())
    #获取登录响应状态码,做断言
     # self.assertEqual(response.status_code,excel[0]['StatusCode'])
     # log.info('响应状态码为200,登录成功')
#设置主函数执行编写的登录脚本
if __name__ == '__main__':
    unittest.main()
注意:
1.获取token需要调通登录接口
2.将token传入到unittest的Setup函数中
3.最后将token传入到header中
python接口自动化之token的处理
提取token
1、json解析提取
# -*- coding:utf-8 -*-
import requests
host = ""
user = ""
pwd = ""
url = host + "/pub/api/v1/web/web_login"
body = {
    "phone": user,
    "pwd": pwd
}
r = requests.post(url=url, data=body).json()  # .json() 就是 json 解析,把json格式转为字典
token = r["data"]["token"]  # 字典取值
print(token)
2、正则提取json
# -*- coding:utf-8 -*-
import requests, re
host = ""
user = ""
pwd = ""
url = host + "/pub/api/v1/web/web_login"
body = {
    "phone": user,
    "pwd": pwd
}
r = requests.post(url=url, data=body).text
print(r)
token = re.findall('"token":"(.+?)"', r)
token = token[0]  # 正则取出来的值是 列表 类型,所以要进行列表取值
print(token)
结合框架使用token

python里面有个全局变量global,但这个只是针对于在同一个.py里才有效,跨脚本就不起作用了。
整体的思路:
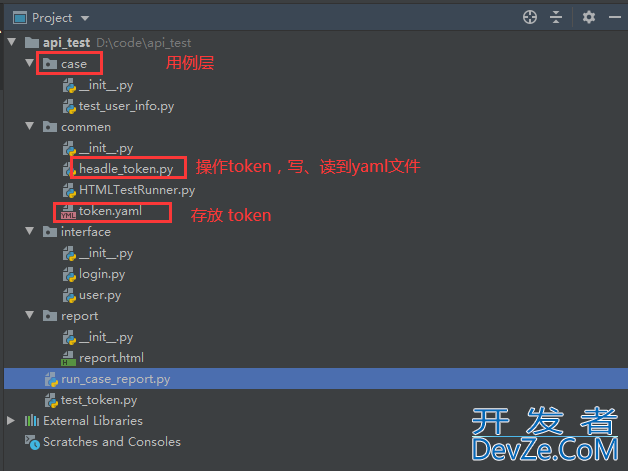
- 1、登录后返回 token,把 token 写入 yaml 文件中,yaml 文件放在公共模块 commen 中
- 2、需要 token 的时候(一般是调用写用例的时候),在初始化中读取 yaml 文件中最新的 token 值
- 3、每个用例的 package 执行的时候去调用获取 token
- 4、最后执行所有用例,生成报告,发送邮件等
所以先把读写 yaml 的方法封装好
headle.py
# -*- coding:utf-8 -*-import os, yaml
defwrite_yaml(token):
    cur = os.path.dirname(os.path.realpath(__file__))  # 获取当前路径
    yaml_path = os.path.join(cur, "token.yaml")  # 获取yaml文件的路径print(yaml_path)
    t = {"token": token}  # 写入的内容withopen(yaml_path, 'w', encoding='utf-8') as f:
       yaml.dump(t, stream=f, allow_unicode=True)
defget_yaml(yaml_file):
    # yaml_file = "D:\\code\\api_test\\commen\\token.yaml"
    f = open(yaml_file, 'r', encoding='utf-8')
    cfg = f.read()
    d = yaml.load(cfg, Loader=yaml.FullLoader)
    """
    用load转字典
    yaml5.1版本后弃用了yaml.load(file)这个用法,因为觉得很不安全,5.1版本之后就修改了需要指定Loader,通过默认加载器(FullLoader)禁止执行任意函数
    Loader=yaml.FullLoader 加上这行代码,告警就没了
    """
    d = d["token"]
    return d
if __name__ == '__main__':
    r = write_yaml("token的值")
封装接口的时候,把 token 设置成变量

user.py
# -*- coding:utf-8 -*-import requests
defuser_info(host, token):
    url = host + '/pub/api/v1/web/user_info'
    headers = {"token": token}  # token 放在请求头
    r = requests.get(url=url, headers=headers)
    return r
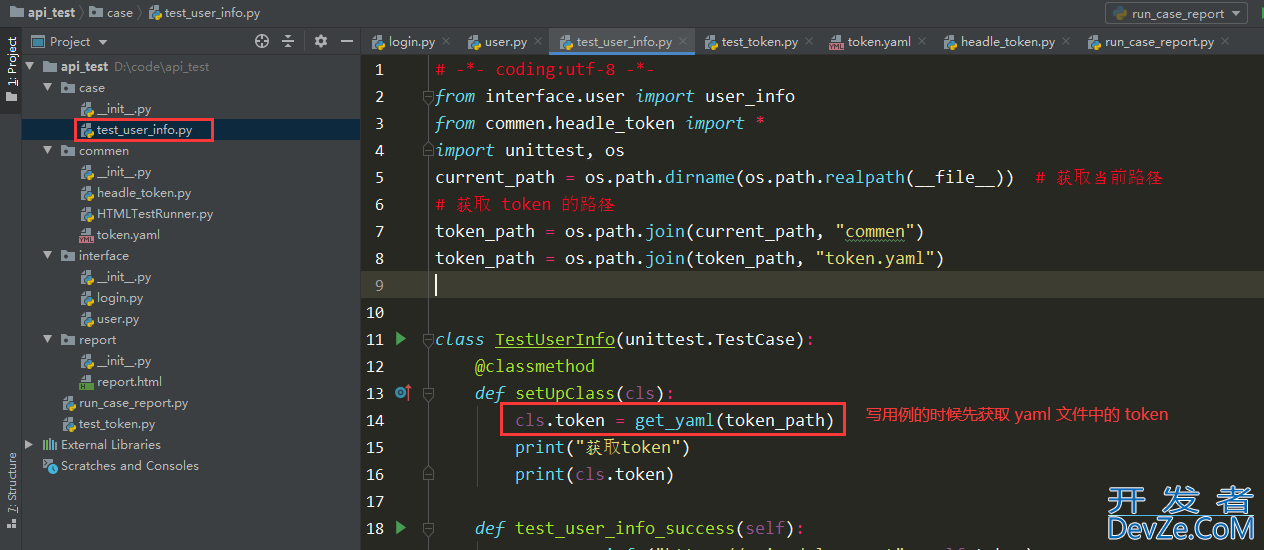
编写用例的时候先获取 yaml 文件中 token 的值

test_user_info.py
# -*- coding:utf-8 -*-from interface.user import user_info
from commen.headle_token import *
import unittest, os
current_path = os.path.dirname(os.path.realpath(__file__))  # 获取当前路径# 获取 token 的路径
token_path = os.path.join(current_path, "commen")
token_path = osphp.path.join(token_path, "token.yaml")
classTestUserInfo(unittest.TestCase):
    @classmethoddefsetUpChttp://www.devze.comlass(cls):
        cls.token = get_yaml(token_path)
        print("获取token")
        print(cls.token)
    deftest_user_info_success(self):
        r = user_info("https://api.xdclass.net", self.token)
        print(r.text)
if __name__ == '__main__':
    unittest.main()
主程序
- 1、登录返回token
- 2、token 写入 yaml 文件
- 3、执行用例初始化的时候先获取 token
- 4、执行用例生成报告
run_case_report.py
# -*- coding:utf-8 -*-
import unittest, os
from commen import htmlTestRunnerandroid
from interface.login import login
from commen.headle_token import *
current_path = os.path.dirname(os.path.realpath(__file__))
case_path = os.path.join(current_path, "case")
report_path = os.path.join(current_path, "report")
report = os.path.join(report_path, "report.html")
def all_case():
    discover = unittest.defaultTestLoader.discover(case_path,
                                                   pattern='test*.py')
    print(discover)
    return discover
def run_case_report():
    fb = open(report, "wb")
    runner = HTMLTestRunner.HTMLTestRunner(
        stream=fb,
        title="python接口自动化之使用token传入到header消息头中",
        description="xx项目的测试报告"
    )
    runner.run(all_case())
    fb.close()
if __name__ == '__main__':
    # 调用登录获取token
    token = login("host", "登录的账号", "密码")
    # 把token写入 yaml 文件
    write_yaml(token)
    # 执行用例的时候会读取 yaml 中的token,case文件下 test_user_info.py 的
    run_case_report()
总结
以上为个人经验,希望能给大家一个参考,也希望大家多多支持编程客栈(www.devze.com)。


 加载中,请稍侯......
精彩评论