使用PyQt5应用程序制作PDF转换成图片的小工具,可以导入PDF文档后一键生成对应的PNG图片编程客栈。
PDF图片转换小工具使用的中间件:
- python版本:3.6.8
- UI应用版本:PyQt5
- PDF文件操作非标准库:PyPDF2
- PNG图片生成库:PyMuPDF
pipinstallPyQt5

pipinstallPyPDF2

pipinstallPyMuPDF==1.18.17
将需要使用到的python标准库或非标准库全部导入到我们的代码块中进入开发环节。
#ImportingalltheclassesfromthePyQt5.QtGuimodule.
fromPyQt5.QtGuiimport*

#ImportingalltheclassesfromthePyQt5.QtCoremodule.
fromPyQt5.QtCoreimport*

#ImportingalltheclassesfromthePyQt5.QtWidgetsmodule.
fromPyQt5.QtWidgetsimport*

#Importingthe`fitz`module.
importfitz

#ImportingthePyPDF2module.
importPyPDF2

#Importingthe`sys`module.
importsys

#Importingtheosmodule.
importos

#Importingthetracebackmodule.
importtraceback
接下来直接进入正题,首先创建名称为PdfToPngUI的python类,将UI组件及布局和相关的槽函数都写入到这个类中。
#Thisclassisawidgetthatcontainsabuttonandatextbox.Whenthebuttonisclicked,thetextboxispopulatedwith
#thepathtotheconvertedfile
classPdfToPngUI(QWidget):
def__init__(self):
"""
Aconstructor.ItiscalledwhenanobjectiscreatedfroMAClassanditallowstheclasstoinitializethe
attributesofaclass.
"""
super(PdfToPngUI,self).__init__()
self.init_ui()

definit_ui(self):
"""
ThisfunctioninitializestheUI.
"""
self.setWindowTitle('PDF图片转换工具公众号:Python 集中营')
self.setWindowIcon(QIcon('analysis.ico'))
self.resize(600,400)

self.source_pdf_path=QLineEdit()
self.source_pdf_path.setPlaceholderText('PDF文件路径')
self.source_pdf_path.setReadOnly(True)

self.source_pdf_btn=QPushButton()
self.source_pdf_btn.setText('导入')
self.source_pdf_btn.clicked.connect(self.source_pdf_btn_click)

self.target_png_path=QLineEdit()
self.target_png_path.setPlaceholderText('目标图片存储路径')
self.target_png_path.setReadOnly(True)

self.target_png_btn=QPushButton()
self.target_png_btn.setText('路径')
self.target_png_btn.clicked.connect(self.target_png_btn_click)

self.start_btn=QPushButton()
self.start_btn.setText('PDF一键生成PNG图片')
self.start_btn.clicked.connect(self.start_btn_click)

self.brower=QTextBrowser()
self.brower.setReadOnly(True)
self.brower.setFont(QFont('宋体',8))
self.brower.setPlaceholderText('日志处理过程区域...')
self.brower.ensureCursorVisible()

grid=QandroidGridLayout()
grid.addWidget(self.source_pdf_path,0,0,1,2)
grid.addWidget(self.source_pdf_btn,0,2,1,1)
grid.addWidget(self.target_png_path,1,0,1,2)
grid.addWidget(self.target_png_btn,1,2,1,1)
grid.addWidget(self.start_btn,2,0,1,3)
grid.addWidget(self.brower,3,0,1,3)

self.pdf_thread=WorkThread(self)
self.pdf_thread.message.connect(self.show_message)
self.pdf_thread.finished.connect(self.finished)

self.setLayout(grid)

defshow_message(self,text):
"""
Itshowsamessage

:paramtext:Thetexttobedisplayed
"""
cursor=self.brower.textCursor()
cursor.movePosition(QTextCursor.End)
self.brower.append(text)
self.编程客栈brower.setTextCursor(cursor)
self.brower.ensureCursorVisible()

defsource_pdf_btn_click(self):
"""
ItopensafiledialogboxtoselectthesourcePDFfile.
"""
source_pdf_path=QFileDialog.getOpenFileName(self,"选取文件",os.getcwd(),"PDFFile(*.pdf)")
self.source_pdf_path.setText(source_pdf_path[0])

deftarget_png_btn_click(self):
"""
Afunctionthatiscalledwhenthetarget_png_btnisclicked.
"""
target_png_path=QFileDialog.getExistingDirectory(self,'选择文件夹',os.getcwd())
self.target_png_path.setText(target_png_path)

defstart_btn_click(self):
"""
Afunctionthatiscalledwhenthestartbuttonisclicked.
"""
self.pdf_thread.start()
self.start_btn.setEnabled(False)

deffinished(self,finished):
"""
Afunctionthatiscalledwhenthetarget_png_btnisclicked
"""
iffinishedisTrue:
self.start_btn.setEnabled(True)
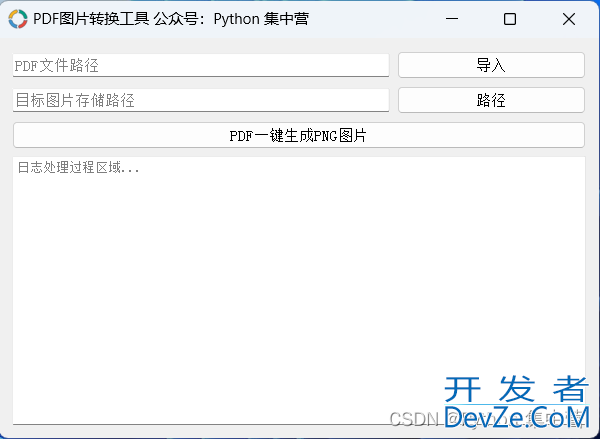
通过上面的PdfToPngUI类开发者_C开发处理,这个时候UI组件及布局和槽函数已经开发完成了,应用的页面效果如下。
然后,我们开始业务逻辑的开发。这里将业务逻辑使用单独的子线程开发避免和页面的主线程发生阻塞。
创建一个子线程的python类WorkThread并继承自QThread子线程,将PDF图片转换的过程写到里面。
#It'saQThreadthatrunsafunctioninaseparatethread
classWorkThread(QThread):
message=pyqtSignal(str)
finished=pyqtSignal(bool)

def__init__(self,parent=None):
"""
Aconstructorthatinitializestheclass.

:paramparent:Theparentwidget
"""
super(WorkThread,self).__init__(parent)
self.working=True
self.parent=parent

def__del__(self):
"""
Adestructor.ItiscalledwhentheobjectisdesdOKuZtroyed.
"""
self.working=False

defrun(self):
"""
 PDF转换图片的业务函数。
"""
try:
source_pdf_path=self.parent.source_pdf_path.text().strip()
target_png_path=self.parent.target_png_path.text().strip()
ifsource_pdf_path==''ortarget_png_path=='':
self.message.emit('来源文件路径或目标存储路径不能为空!')
self.finished.emit(True)
return

self.message.emit('源文件路径:{}'.format(source_pdf_path))
self.message.emit('目标文件路径:{}'.format(target_png_path))

pdf_=fitz.open(source_pdf_path)
self.message.emit('成功打开PDF文件对象!')
reader=PyPDF2.PdfFileReader(source_pdf_path)
self.message.emit('PDF文件流处理完成!')
page_num=reader.getNumPages()
self.message.emit('PDF文件页数读取完成!')

forninrange(0,page_num):
page=pdf_.load_page(n)
pix_=page.get_pixmap()
pix_.save(os.path.join(target_png_path,str(n)+'.png'))
self.message.emit('图片保存成功:{}'.format(os.path.join(target_png_path,str(n)+'.png')))
self.message.emit('PNG图片全部转换完成!')
self.finished.emit(True)
except:
traceback.print_exc()
self.message.emit('程序运行出现错误,请检查参数是否设置正确!')
self.finished.emit(True)
经过上述的UI界面组件以及业务线程的开发,功能已经实现了,下面使用main函数调起整个应用就OK了。
if__name__=='__maijavascriptn__':
app=QApplication(sys.argv)
main=PdfToPngUI()
main.show()
sys.exit(app.exec_())
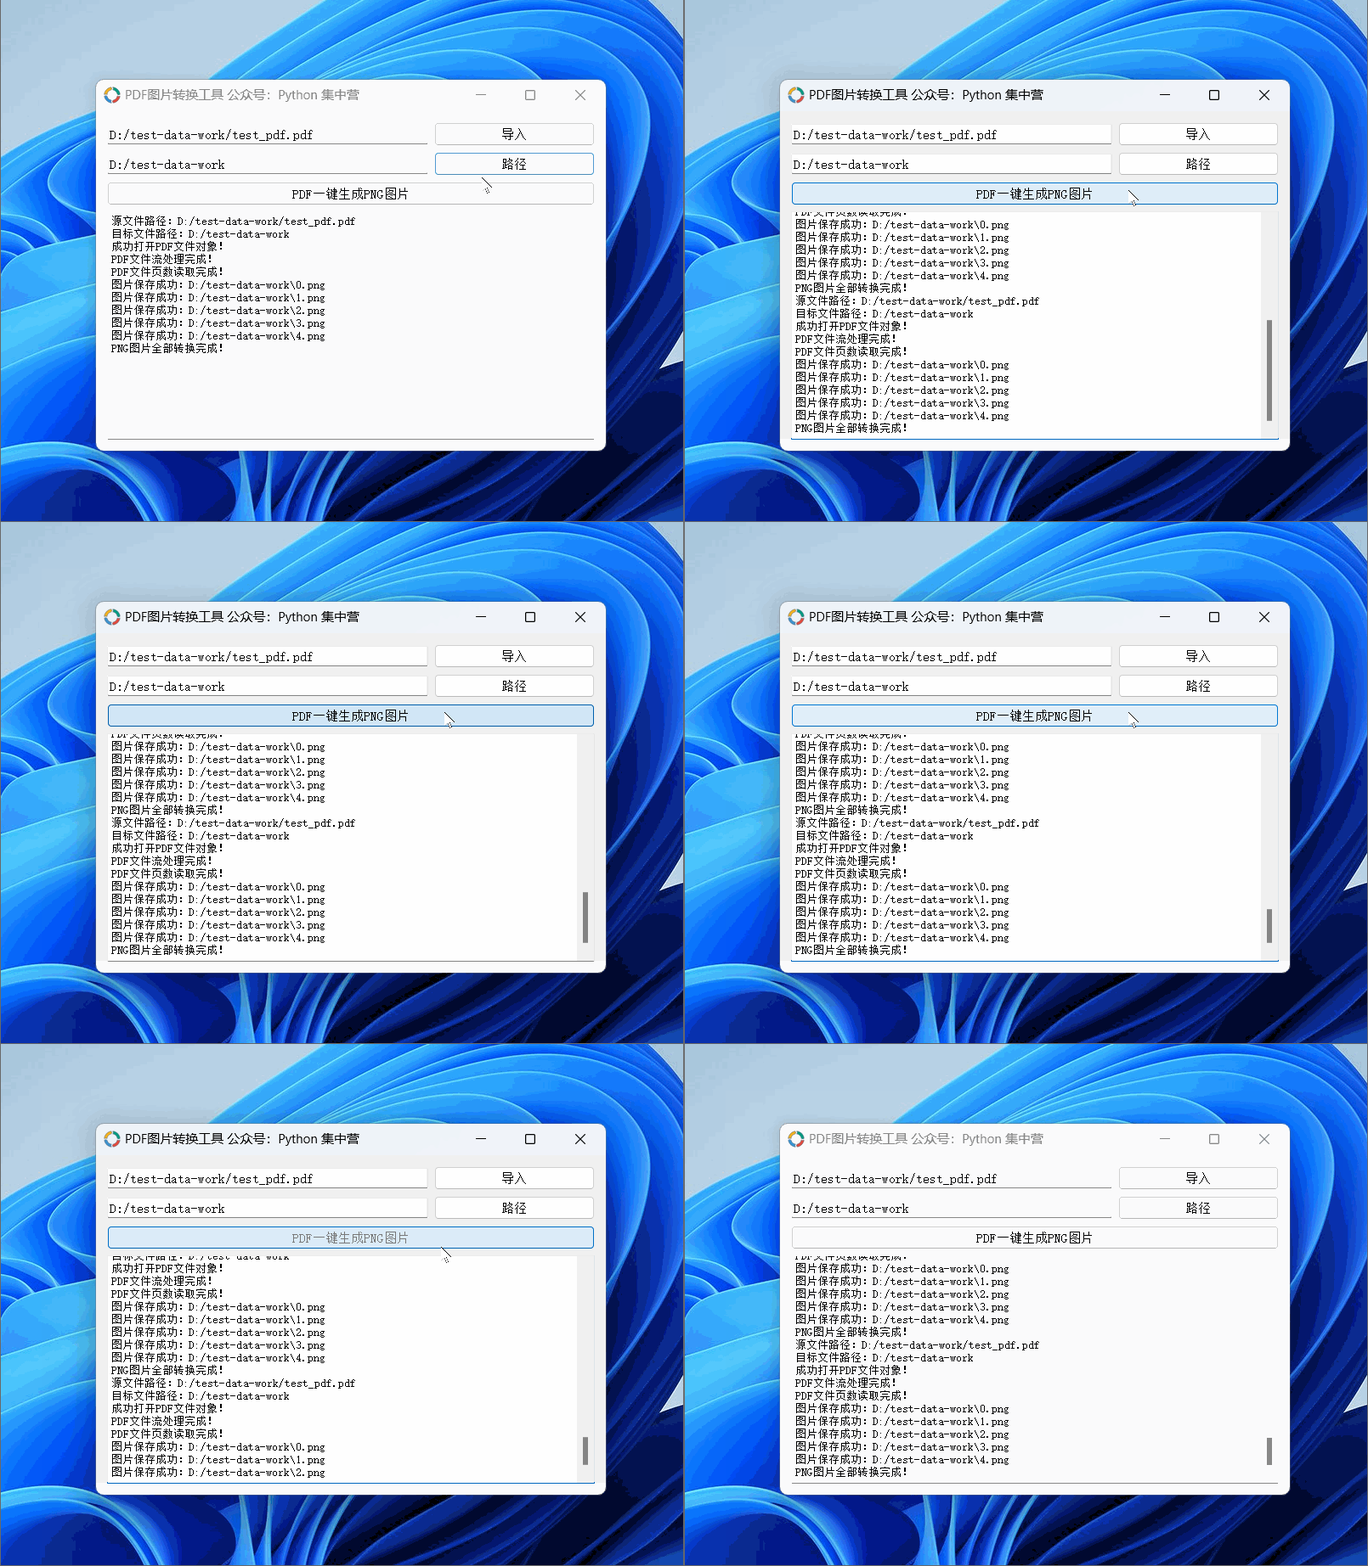
以上就是Python自制一个PDF转PNG图片小工具的详细内容,更多关于Python PDF转PNG的资料请关注我们其它相关文章!



 加载中,请稍侯......
精彩评论